Cross-posted from Kelsey Wood with permission. Kelsey is a PhD student at U.C. Davis.
How to make a DNA bracelet, from any organism and any gene!

I study plant-pathogen interactions, so I chose to make a sequence from a wild tobacco gene that is important for plant defense against pathogens.
What you’ll need:
- Four colors of beads
- Elastic string
- The sequence of a gene
If you don’t have a sequence of a gene on hand, there are some great suggestions in this instruction manual or you can find one by following the instructions below…
To find the sequence for a gene you are interested in, NCBI is a great resource: https://www.ncbi.nlm.nih.gov/. You can search by gene name and by organism. Google can also be useful to find the NCBI identifier for a given gene.
Once you have the sequence of your gene of interest, you can use a program called PrimerBLAST to pick unique regions for your DNA bracelet. Since genes are on average 1000 basepairs (letters) long, we first need to pick a short sequence from the gene that we will use as a template for our bracelet. Since many genes are shared across organisms, if we want to pick a sequence that is unique to our organism and gene, we need to check that the same sequence doesn’t exist in a related organism or a related gene.
To use PrimerBLAST, paste your sequence or use the NCBI accession number for the gene. Make sure you select “Enable search for primer pairs specific to the intended PCR template”. I use the “nr” database (non-redundant sequences from all organisms) and delete the default “Homo sapiens” from organism name.

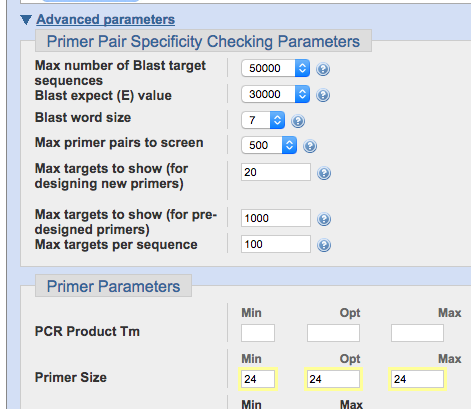
Next, to get a sequence that is the right length for the bracelet, scroll down to the bottom and specify 24 basepairs as the optimum primer length. You can do larger or smaller depending on the size of your wrist. I think 21 basepairs is a good size for kids, but you could probably make it up to 27 bp for adults with larger wrists. You could always start with a longer sequence and then make it shorter depending on the size of your wrist.

Next, hit “Get Primers” to find sequences unique to your gene. PrimerBLAST will probably give a warning and a list of genes which will probably correspond to the gene you are searching for. Select all targets as intended or acceptable and hit ok.
Here PrimerBLAST will give you some sequences. Pick one of the “forward” primers that you like best and copy the sequence down. I like to pick one that doesn’t have too many repeated letters for my bracelet due to aesthetic reasons.
Now you can make a bracelet representing your sequence! There are four letters of DNA representing the four chemicals that encode all of the genetic information. You can use different colored beads to represent the four letters of DNA.
A = adenine = green beads
T = thymine = red beads
C = cytosine = yellow beads
G = guanine = blue beads
You could use other colors of beads if you don’t have these four colors on hand, but these are the colors that correspond to the fluorescent dyes used for the four bases in DNA sequencing.
DNA is double stranded and the first strand is the template for the second strand, following these complementary base pairing rules: A pairs with T and C pairs with G.
For your DNA bracelet, I’d recommend that you make one strand first and then use it as a template to make the second strand, following the base pairing rules.
We recently made DNA bracelets as an outreach activity at UC Davis Picnic Day and it was very successful. Kids, parents, and undergrads alike loved making the bracelets and learned something about the structure of DNA and how the base pairing rules are used for DNA replication in the process.

Picnic Day. Photo Credit: Marwa Zafarullah
If you decide to make a bracelet, I’d love to see it! Let me know on Twitter (@klsywd) or leave it in the comments here! If you post a pic on Twitter use the hashtag #DNAbracelets.
Feel free to reach out to me if you are having any problems finding a gene or following these instructions or if you have any questions!
The original DNA bracelet making activity was created by Wellcome Sanger Trust. A PDF of their instructions can be found here: ftp://ftp.sanger.ac.uk/pub/yourgenome/downloads/activities/sequence-bracelets/ftsequencebracelets.pdf

